Gluten-free Cooking for Kids
User login


Unleavened Rice Bread
Yield
Preparation time
Ingredients
Directions
Measure out the rice flour and dessicated coconut and place in a medium sized bowl. Combine well.
In a large saucepan bring 200 ml of water to the boil. Have a kettle of boiled water to hand in case you need to add a bit more. Add the salt. Take the pan off the heat and tip in the rice flour and coconut. Mix with a sturdy wooden spoon. The mixture should form a soft pliable dough (a bit like playdough). It the dough seems a bit dry, add a little more hot water until you reach the right consistency. Do this gradually as you don't want a really wet and sticky dough. Put a lid on the pan making sure you've turned off the heat and let the dough stand in the pan for about ten minutes.
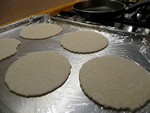
Now knead the dough a few times on a wooden board, using a little more flour if necessary to stop it sticking. Shape the dough into a log and wrap in clingfilm. You can keep this in the fridge for a day or two, until you are ready to use it.

Notes
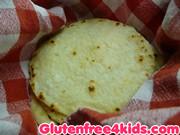
Unleavened rice bread - the taste test
I tried these a couple of weeks ago - they are delicious, light, distinctive and have a subtle taste of coconut. There's a slight crispy resistance when you bite into this "pancake", followed by a softer inner centre. What I love about this taste experience is that you are instantaneously transported by your senses to the Tropics, they feel exotic. Where do I get transported to? I hear you ask, for me it was Panama. There you go.
Unleavened rice bread- origins
I was at a friend's house this afternoon when I spotted a copy of a Guatemalan and Mayan Cookbook called False Tongues and Sunday Bread. I was flicking through it and noticed a recipe almost identical to this one called Tortillas de Harina con Coco, which translates as flour tortillas with coconut. I was blown away as I read the introduction. It says that tortillas originated in India as chapatis and were brought over by the early Hindu laborers and adapted to the local diet over the years. Using my tortilla press to make these breads seemed liked a novel idea, but I guess I wasn't the first one to think about doing this! The connection between the Far East and Central America through a common staple like bread, is something I was not aware of. But having made the link, I am going back to that Guatemalan Mayan cookbook to see what other bread recipes could be adapted for gluten free diets. Oh and one more thing, it appears that these breads are really nice fried in oil and served with dips. Yep, I'm definately going to try this out on you Marc.